Training a Deep Learning model using Parallel GPUs for 10X performance boost
Background
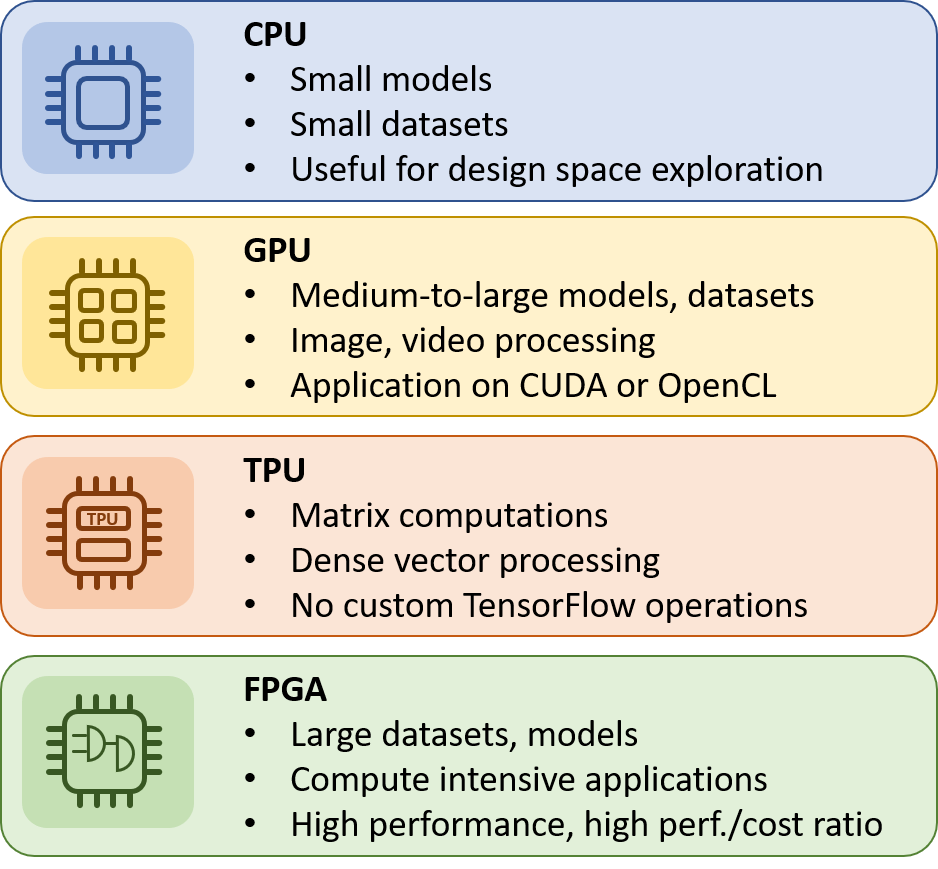
When you have a large training dataset or a compute intensive deep learning model , CPUs alone wouldn't suffice to handle the load, hence GPUs were introduced in the model training space in the recent years.
Of late, there have been numerous use cases and researchers preferred TPUs ,FPGAs over GPUs for various reasons.
This article mainly focuses on how one can train a deep learning model using distributed GPUs
When to use what - A guideline
Let's get into Action with an example
I will walk you through the steps with an example model trained against Nvidia GPU machine with 8 GPU Cards 16GB memory each powered by Volta Architecture (V100)
Pre-requisite
1. Ensure Cuda is installed
CUDA (Compute Unified Device Architecture) is a parallel computing platform and application programming interface (API) model created by Nvidia.
cat /usr/local/cuda/version.txt
CUDA Version 9.2.148
Option 1 : Manual Library installation
1. Lets create a python virtual environment
[suresh@gpu_host bin]$ ./conda create -n multigpu
[suresh@gpu_host bin]$ source activate multigpu
2. Lets Install some basic ML libraries inside our virtual environment
(multigpu) [suresh@gpu_host bin]$ conda install pandas
(multigpu) [suresh@gpu_host bin]$ conda install scipy
(multigpu) [suresh@gpu_host bin]$ conda install scikit-learn
(multigpu) [suresh@gpu_host bin]$ conda install matplotlib
(multigpu) [suresh@gpu_host bin]$ conda install keras
PS: if you create a python virtual environment using Conda, then always use conda install <package> name , and not pip install , cause using pip and conda interchangeably may cause library incompatibility issues
PS : installing Keras module itslef brings tensorflow(cpu),but to ensure your Keras model runs on GPU and not CPU, you need to install tensorflow-gpu over and above tensorflow.
(multigpu) [suresh@gpu_host bin]$ conda install tensorflow-gpu
3. Let's Run the command below and ensure all the necessary python packages are installed.
(multigpu) [suresh@gpu_host KerasDLModel]$ conda list
4. Now let's set the Keras models to use Tensorflow framework as the backend
(multigpu) [suresh@gpu_host bin]$ export KERAS_BACKEND=tensorflow
5. Now let's execute the model
(multigpu) [suresh@gpu_host bin]$ nohup python KerasDLModel/seq2seq_glove_train.py > train.out 2>&1 &
or using horovod runner to run the model in 2 threads/GPUs
(multigpu) [suresh@gpu_host bin]$horovodrun -np 2 -H localhost:2 --mpi python KerasDLModel/seq2seq_glove_train.py
You might be wondering what my model does, for experimentation purpose i just took an NLP sample word embedding by following this link . There are plenty of samples out there , i assume you have a real model. :-)
6. Now monitor the progress ad utilization of the GPUs
(multigpu) [suresh@gpu_host bin]$ nvidia-smi -l

Option 2 : Using NVidia docker image that contains all needed ML/DL libraries
Pre-Requisites
1. Check if the machine is docker ready
[suresh@gpu_host bin]$ docker container ls
(or)
[suresh@gpu_host bin]$ docker ps
usermod -a -G docker
docker attach <container_id>
docker exec <container_id>
2. Check if there are any docker images in the server
[suresh@gpu_host bin]$ docker image ls
Steps
1 . Sign up for your personal login at Nvidia's docker Cloud , make a note of the token or Key for your account
2 . Login to nvcr docker cloud from the GPU host
[suresh@gpu_host2 ~/Docker_custom]$ docker login nvcr.io
Username: $oauthtoken
Password:
WARNING! Your password will be stored unencrypted in /home/suresh/.docker/config.json.
Configure a credential helper to remove this warning. See
https://docs.docker.com/engine/reference/commandline/login/#credentials-store
Login Succeeded
3. Create a docker file with instructions , like pull the image and install additional packages on top of the container etc, this file can also include all the bootstrap commands when the container comes up
cat Dockerfile <<echo "
FROM nvcr.io/nvidia/tensorflow:18.08-py3
RUN pip install keras
RUN pip install pandas sklearn ipython"
4. Build a custom image called deeplearning using the docker file above ,which uses nvcr.io/nvidia/tensorflow:18.08-py3 as the base image
[suresh@gpu_host2 ~/Docker_custom]$ docker build -t deeplearning .
alternatively , You could also run the Nvidia base image as is and then install whatever package you want inside it at a later point , if you do so you can commit the container state into a new name using the container's id
[suresh@gpu_host2 ~]$ docker commit b026b5e99e18 deeplearning
5. Now lets start the container container pointing to home dir with user as your uid, where deeplearnig is the container name
[suresh@gpu_host2 ~]$nvidia-docker run --shm-size=1g -u 1033:1033 --net=host --ulimit memlock=-1 --ulimit stack=67108864 -it --rm -v /home/suresh:/home/suresh deeplearning bash
Decoding the options from the above command :-)
-it means run in interactive mode
--rm will delete the container when finished
-v is the mounting directory
/home/suresh is the directory or file from your host system (absolute path) that you want to access from inside your container. For example, the local_dir in the following path is /home/suresh
--net=host -> this is to specify to use the network from the host system and not inside the image
6. Once the container started and your local directory is mounted, you could create and activate a python virtual environment inside
root@gpu_host2:/workspace# source /home/suresh/anaconda3/bin/activate /home/suresh/anaconda3/envs/multigpu/
7 . To have remote access to the Jupyter Notebook running inside the container, lets add some config options and spin it up
$jupyter notebook --generate-config
$echo "c.NotebookApp.allow_remote_access = True >> ~/.jupyter/jupyter_notebook_config.py # Choose True if want to allow remote access
You could customize a lot , ex. the port for the notebook web app,encrypted password,SSL certificate configuration etc. Refer here for complete config options
8. Lets start the notebook app
nohup /home/suresh/.conda/envs/multigpu/bin/python /home/suresh/.conda/envs/multigpu/bin/jupyter-notebook --config /home/suresh/.conda/envs/multigpu/jupyter_notebook_config.py > /home/suresh/.conda/envs/multigpu/notebook.log 2>&1 &
Open up a browser and access http://<hostname>:8888
Conclusion:
Though there are 2 ways to leverage Distributed GPUs like openmpi framework and Horovod, i personally liked Horovod ( Open sourced by Uber for distributed deep learning) . When it comes to utilizing multiple GPUs what really goes into parallel execution and what will get executed in a single GPU is still a mystery to me. Finally one has to make few code changes in order to make the code executable in parallel GPUs. It is worth trying out .
References :
https://jupyter-notebook.readthedocs.io/en/stable/index.html
https://towardsdatascience.com/solving-nlp-task-using-sequence2sequence-model-from-zero-to-hero-c193c1bd03d1
https://towardsdatascience.com/how-to-implement-seq2seq-lstm-model-in-keras-shortcutnlp-6f355f3e5639

It is a very informative and useful post thanks it is good material to read this post increases my knowledge. Designing and Implementing an Azure AI Solution course AI-100
ReplyDeleteExcellent idea. Thank you for sharing the useful information. Share more updates.
ReplyDeleteDeep Learning with Tensorflow Online Course
Pytest Online Training